


Are you wanting to change the font in your WordPress theme to one thing completely different?
Your web site textual content font performs an essential position in your website’s design and model identification. It can enhance the readability of your content material and make your website look fashionable {and professional}.
In this text, we’ll present you the way to change font in WordPress utilizing 5 other ways, so you’ll be able to simply change fonts utilizing no-code methodology, or change WordPress font with out utilizing any plugin.
Why Change Fonts on Your WordPress Website?
Fonts are a vital a part of your web site design and have a huge effect on how your WordPress site will appear and feel.
If your web site has a troublesome font to learn, then will probably be arduous to retain guests, they usually’ll finally abandon your website.
A font additionally exhibits your model identification. For occasion, you need to use particular fonts to make your website look extra skilled, or informal.
WordPress themes include a default font, font measurement, and font shade in your web site. However, it’s your decision to change the default font to one thing completely different.
That mentioned, there are a number of methods of fixing fonts in WordPress. We’ll present you many completely different strategies. You can click on the hyperlinks beneath to bounce forward to any part.
- Changing Fonts in WordPress Theme Customizer
- Changing Fonts in WordPress Full Site Editor
- Change WordPress Fonts Using a WordPress Plugin
- Change Fonts Using a WordPress Theme Builder
- Customize Font Appearance in WordPress Content Editor
Changing Fonts in WordPress Theme Customizer
An straightforward means of fixing your website’s font is by going to the WordPress theme customizer. It permits you to change the looks of your web site and exhibits a real-time preview.
Note: If your customizer menu option is missing, then your theme doubtless has full website enhancing enabled and also you’ll want to use a special methodology or change themes.
For this tutorial, we’ll use the Astra theme. However, the choices will change relying on the WordPress theme you utilize. Depending in your theme, you’ll need to search for ‘font’ or ‘typography’ choices in the customizer.
First, you’ll be able to head over to Appearance » Customize out of your WordPress dashboard.
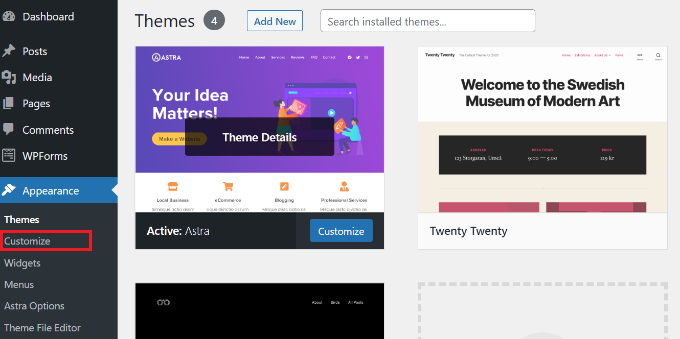
This will launch the WordPress theme customizer.
The Astra theme has a ‘Global’ part with choices to change site-wide kinds. To change the font in your complete web site, you’ll be able to click on the ‘Global’ possibility from the menu in your left.
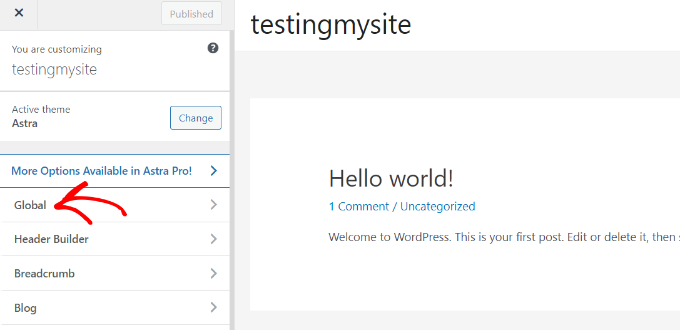
On the following display screen, you’ll see choices like typography, colours, container, and buttons.
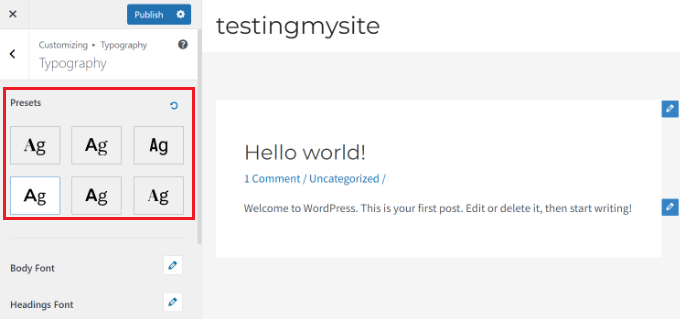
Go forward and click on the ‘Typography’ possibility.
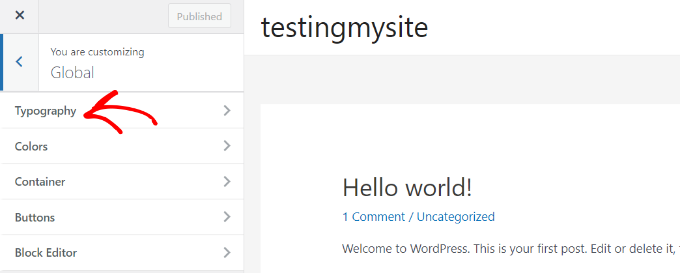
From right here, you’ll be able to select completely different fonts below the ‘Presets’ part.
These are default fonts provided by the theme and deciding on a preset will change the font in your complete web site.
Besides that, you too can change fonts for particular person parts in your theme.
For instance, you need to use a special font for physique and headings. There are even choices to use separate fonts for every heading degree.
To begin, merely select a font from the ‘Font Family’ dropdown menu for any particular person factor.
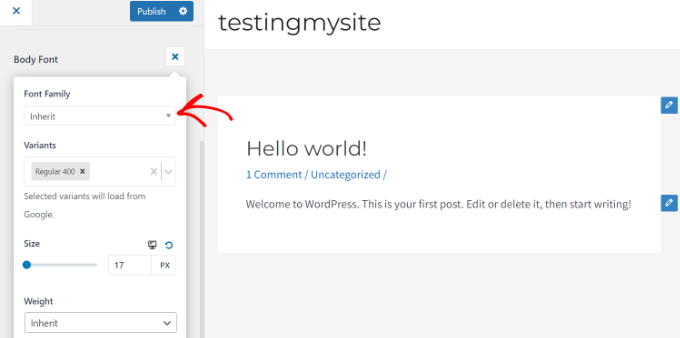
Besides that, there are extra choices to change the font measurement, weight, choose variants, and extra.
When you’re carried out, don’t overlook to click on the ‘Publish’ button.
You can now go to your web site and see the brand new font. For occasion, we modified the physique font to Roboto and the heading font to Helvetica on our demo website.

It’s essential to observe that not all WordPress themes will supply the identical options and customizations that Astra is providing. If your theme doesn’t supply that, then proceed studying to the following step.
Changing Fonts in WordPress Full Site Editor
If you’re utilizing a block-based WordPress theme like Twenty Twenty-Two, then you’ll be able to change your website’s font utilizing the total website editor (FSE).
The full website editor permits you to customise your WordPress theme utilizing blocks, identical to when enhancing posts or pages utilizing the WordPress content material editor. However, FSE is at present in beta and solely a handful of themes help it.
For the sake of this tutorial, we’ll use the Twenty Twenty-Two theme.
To get began, you’ll be able to head over to Appearance » Editor from the WordPress admin panel.

This will open the total website editor in your WordPress theme.
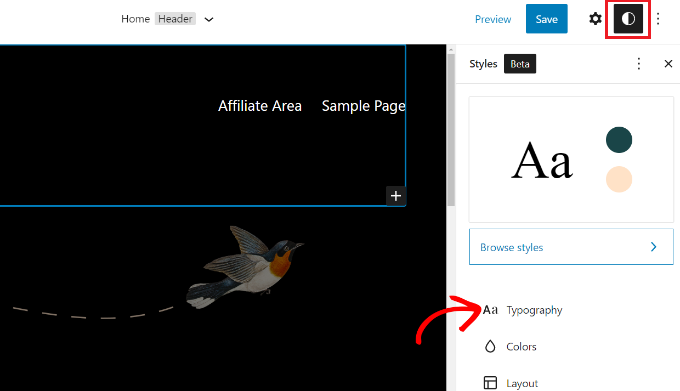
Next, you’ll be able to click on the Styles icon in the highest proper nook after which click on on the ‘Typography’ possibility.
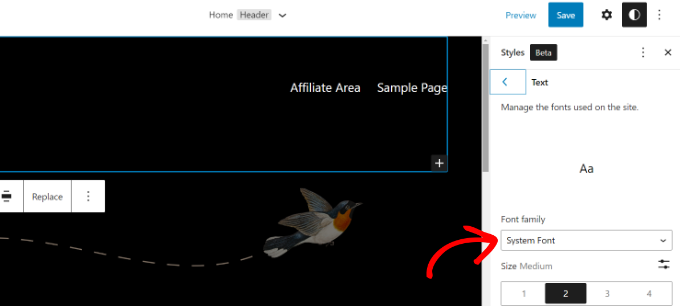
After that, you’ll be able to choose parts like textual content and hyperlinks to change their typography.
We’ll choose Text because the factor after which click on on the ‘Font Family’ dropdown menu to change its font.
When you’re carried out, merely click on the ‘Save’ button.
You’ve efficiently modified the font utilizing the total website editor. You also can add custom fonts to your WordPress site as effectively after which change them in the total website editor.
Change WordPress Fonts Using a WordPress Plugin
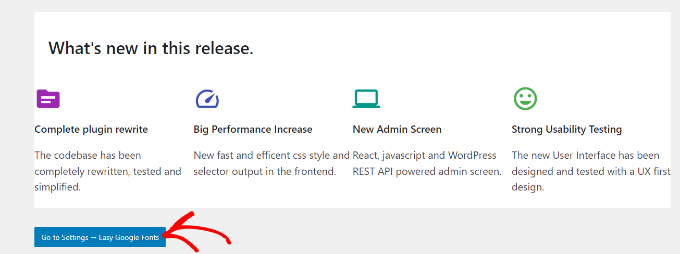
Another means of fixing WordPress fonts is by utilizing a WordPress plugin like Easy Google Fonts.
It’s a free WordPress typography plugin that allows you to add over 600 Google fonts and completely different font variants to your web site.
First, you’ll want to set up and activate the Easy Google Fonts plugin. If you need assistance, then please see our information on how to install a WordPress plugin.
Upon activation, you will note the Easy Google Fonts welcome display screen in your WordPress dashboard. You can scroll down and click on the ‘Go to Settings → Easy Google Fonts’ button.
On the following display screen, you will note completely different plugin settings.
Go forward and click on the ‘Manage with Live Preview’ button on the high.
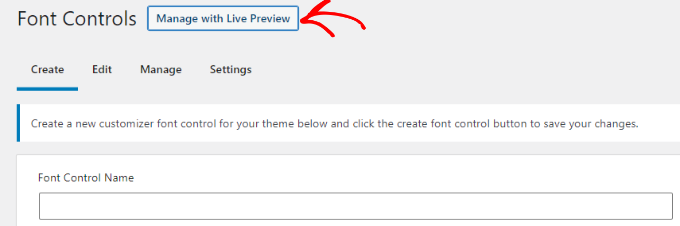
This will open the WordPress theme customizer, and also you be in the ‘Typography’ tab.
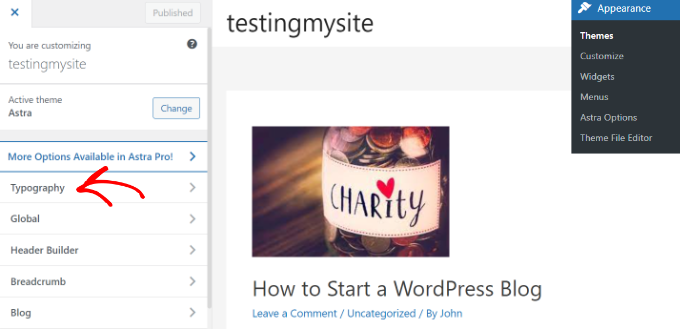
Another means of accessing fonts added by the plugin is by going to Appearance » Customize out of your WordPress dashboard after which clicking the ‘Typography’ tab.
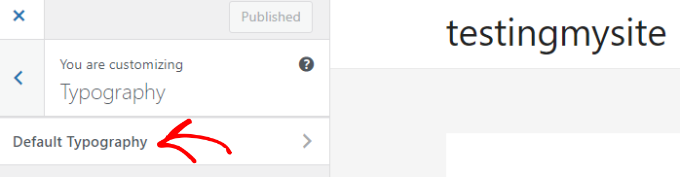
On the following display screen, you’ll see the ‘Default Typography’ possibility.
Go forward and click on on it.
After that, you’ll be able to change the font of each factor in your web site.
For instance, let’s change the font of Heading 1. Simply click on the arrow subsequent to Heading 1 to broaden the choices. From right here, you’ll be able to click on the ‘Font Family’ dropdown menu and choose a font.
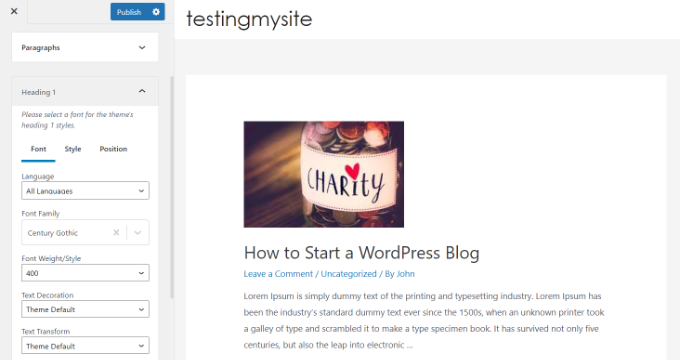
You can do the identical for different heading ranges and paragraphs.
Don’t overlook to click on the ‘Publish’ button if you’re carried out.
Change Fonts Using a WordPress Theme Builder
There are many highly effective WordPress theme builders that allow you to create a customized theme with out enhancing code. You can use them to change the font of various parts in your web site.
For this tutorial, we’ll use SeedProd. It’s the best landing page and theme builder plugin for WordPress and gives a drag and drop builder to create customized themes with out touching a single line of code.
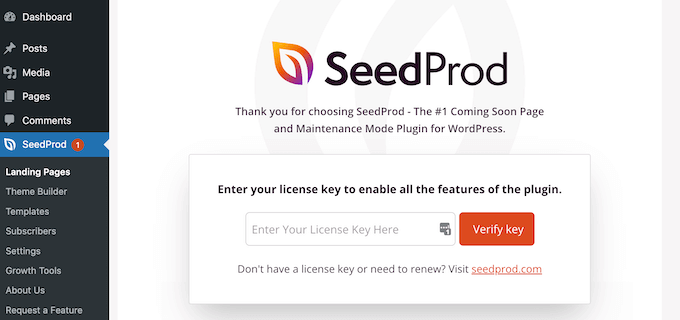
Note that you just’ll want the SeedProd Pro version as a result of it contains the theme builder. There can be a SeedProd Lite version that you need to use free of charge.
First, you’ll want to set up and activate the SeedProd plugin. For extra particulars, please see our information on how to install a WordPress plugin.
Upon activation, you’ll see the SeedProd welcome display screen. Go forward and enter your license key and click on the ‘Verify key’ button. You can simply discover the license key in your SeedProd account space.
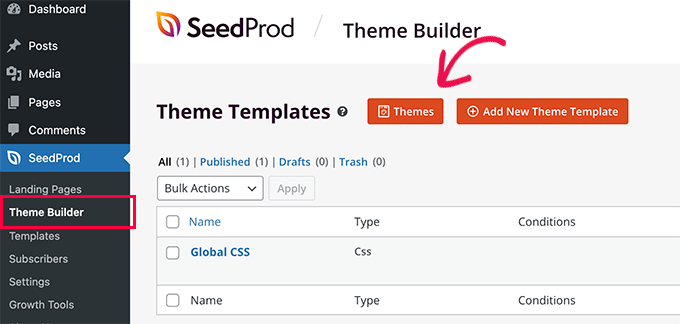
After that, you’ll be able to head over to SeedProd » Theme Builder from the WordPress dashboard.
Next, go forward and click on the ‘Themes’ button on the high.
From right here, the plugin will present you a number of themes to select from.
Simply hover over a theme you need to use after which click on on it. We’ll use the Starter theme for this tutorial.

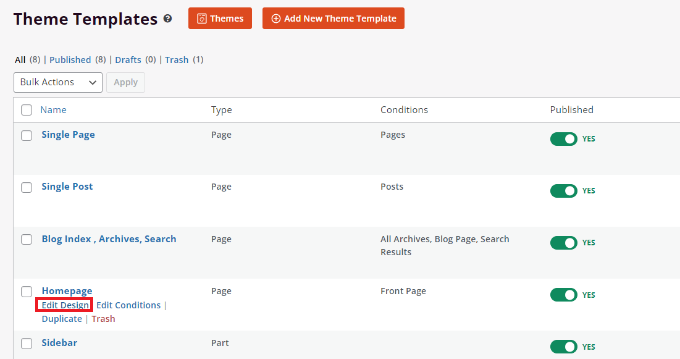
SeedProd will now generate completely different theme templates.
You can edit every template and customise your WordPress theme. There’s even an possibility to manually add a theme template.
Let’s edit the Homepage theme template and alter the fonts of various parts. To begin, click on the ‘Edit Design’ hyperlink below Homepage.
This will launch the SeedProd’s drag and drop theme builder. You can add new parts from the menu in your left and place them wherever on the template.
To change the font of any theme part, merely choose it. For instance, we’ll choose the textual content field below the Starter heading.
Next, go to the ‘Advanced’ tab from the menu in your left and click on the ‘Edit’ button in entrance of Typography.
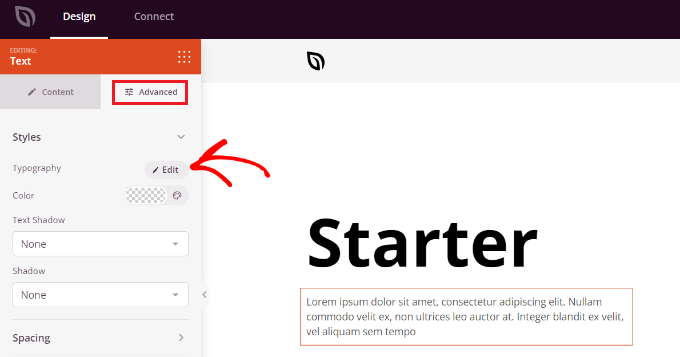
After that, you’ll see a number of choices to edit the typography of your chosen part.
You can click on on the ‘Font Family’ dropdown menu and select a font in your textual content. There are additionally choices to choose font weight, adjust the font size, line peak, letter spacing, alignment, letter case, and extra.
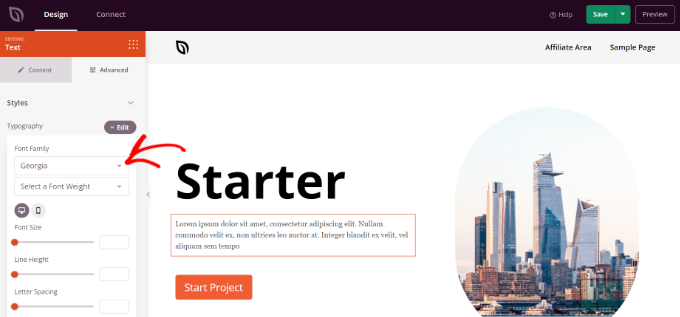
You can now repeat this step and alter the font of different parts in your theme.
When you’re carried out, merely click on the ‘Save’ button on the high.
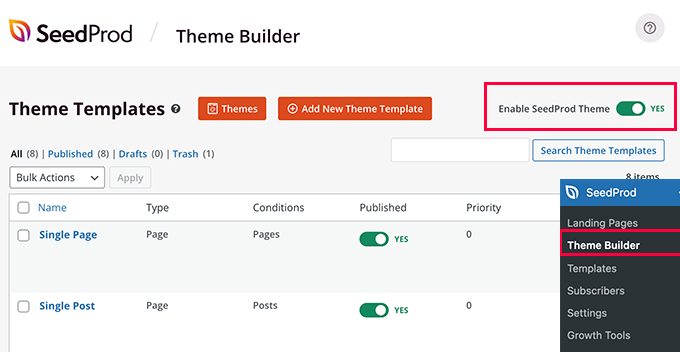
To apply the customized theme and fonts, go to SeedProd » Theme Builder and toggle the change subsequent to the ‘Enable SeedProd Theme’ possibility to Yes.
If you’re wanting to create a WordPress theme from scratch, then see our information on how to easily create a custom WordPress theme.
Customize Font Appearance in WordPress Content Editor
Using the content material editor, you too can change how your fonts seem in particular weblog posts and pages.
The draw back of this methodology is that it’s going to solely apply the brand new font to that exact submit or web page solely. You’d have to repeat this step manually for all different posts the place you need to apply related customization.
This will be actually useful for submit particular customizations, however for those who’re in search of a sitewide font change possibility, then you must contemplate the opposite choices as a substitute.
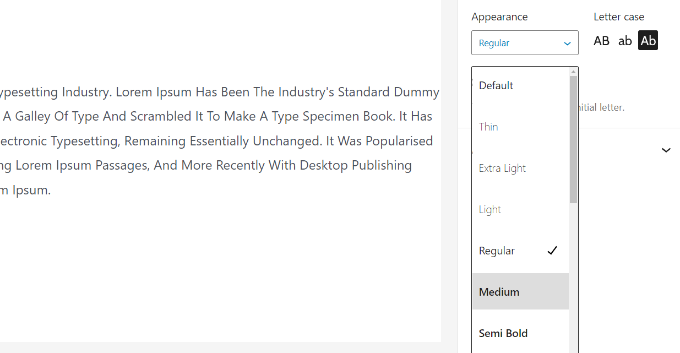
With that mentioned, to change the font utilizing WordPress content material editor, merely edit a submit or add a brand new one. Once you’re in the WordPress content editor, choose the textual content to change its look.
In the settings panel in your proper, head to the ‘Typography’ part. Then click on the three dots in entrance of Typography and choose ‘Appearance’ from the dropdown choices.
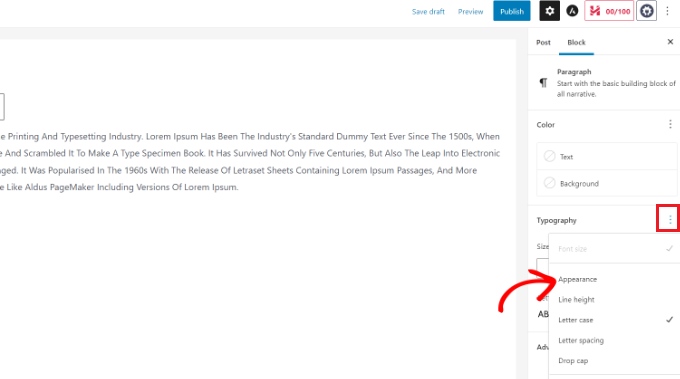
Once you do this, the Appearance settings shall be seen below the Typography part.
Simply click on the dropdown menu below Appearance and choose a mode in your font. For instance, you may make the font daring, skinny, italic, black, daring italic, further daring, and extra.
There are additionally choices to change the font size, select a letter case, edit the colour, enable drop caps, and extra.
Don’t overlook to replace or publish your web page if you’re carried out.
We hope this text helped you learn the way to change font in WordPress. You also can see our final WordPress SEO guide for beginners, and take a look at our expert-pick of the best email marketing services for small companies.
If you favored this text, then please subscribe to our YouTube Channel for WordPress video tutorials. You also can discover us on Twitter and Facebook.
The submit How to Change Fonts in Your WordPress Theme (5 Easy Ways) first appeared on WPBeginner.
")


