


")
Do you need to present a {custom} header in your WordPress web site?
Many WordPress themes include a built-in header that sits on the high of every web page. You may have to customise it to add vital hyperlinks, social icons, web site search, or different components to make an excellent first impression.
In this text, we’ll present you ways to customise your WordPress header and even create a totally {custom} header in your total web site or particular pages.
What Is the Header in WordPress?
Your web site header is the highest part of each web page in your WordPress web site, and doubtless the very first thing your guests will see.
It usually shows your website logo and title, navigation menus, and different vital components that you really want customers to see first.
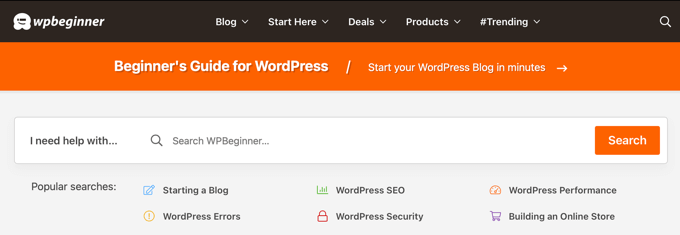
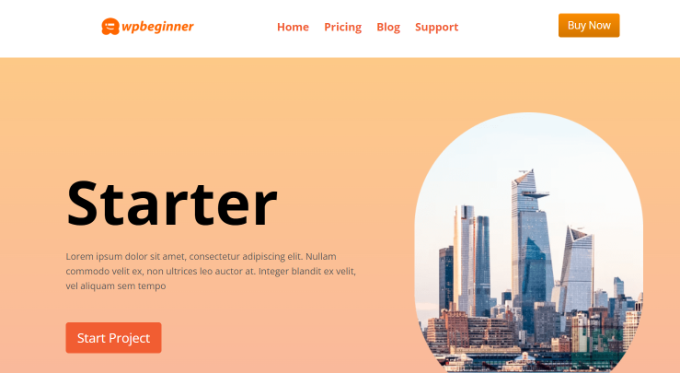
For instance, right here’s our header space on WPBeginner that hundreds of thousands of readers see each month.
By customizing your web site’s header, you can provide it a novel design and make it extra helpful in your guests. You can hyperlink to your hottest pages, show social icons or your business phone number, and present name to motion buttons for extra conversions.
With that being stated, let’s check out how to simply customise your WordPress header. You can use the next hyperlinks to bounce to the part you need to learn.
- Customize Header by Using the WordPress Theme Customizer
- Customize Header by Using the WordPress Full Site Editor
- Create Custom Header and Page Layouts with SeedProd
- Adding a Custom Header for Each Category
- Add a Widget Area to Your WordPress Header
- Add Random Header Images to Your WordPress Blog
- Add Custom Code to Your Website’s Header (Advanced)
Customize Header by Using the WordPress Theme Customizer
Many common WordPress themes allow you to use the WordPress theme customizer to make adjustments to the header space of your WordPress format. This characteristic is typically known as a custom header, however not all themes help it.
You ought to begin by navigating to Appearance » Customize in your WordPress admin space.
Note: If you don’t see Appearance » Customize in your WordPress admin menu, however solely see Appearance » Editor (Beta), then which means your theme has enabled full-site enhancing. In that case, it’s best to skip to the following part.
Your theme might add a ‘Header’ part to the customizer, or add header choices below the ‘Color’ part, however this varies from theme to theme. Here are just a few examples.
Some themes, like Twenty Twenty-One, don’t supply header customization choices in any respect. In this case, we suggest you utilize a drag & drop theme builder plugin like SeedProd that we cowl under.
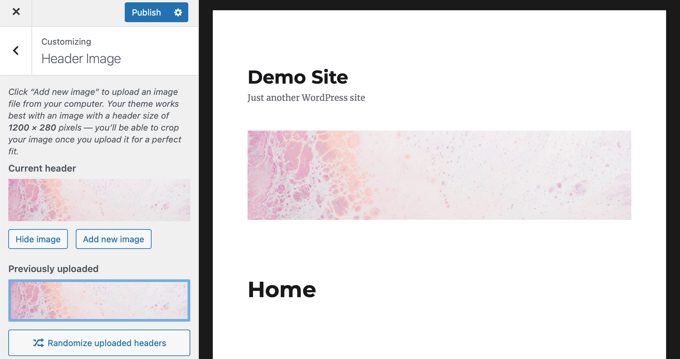
The Twenty Sixteen theme permits you to add a background image to the header, and even add random header images.
Some free and premium WordPress themes supply much more theme customization choices. For instance, you might have the option to change your header’s font type, format, colours, and way more. But you’re restricted to what the theme developer permits you to do.
For instance, you’ll be able to create a {custom} header utilizing the theme customizer with the Astra theme.
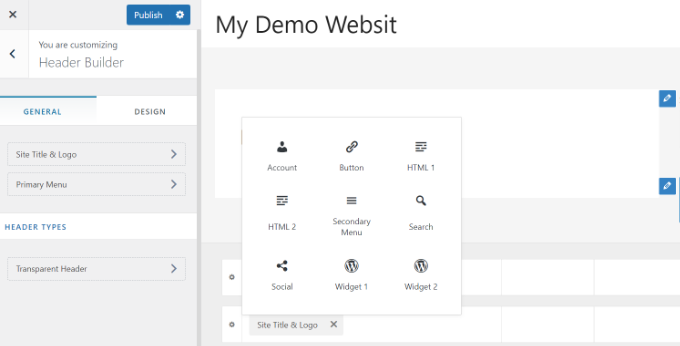
Astra has a devoted ‘Header Builder’ choice within the panel in your left. Here you’ll discover totally different settings to edit the looks and elegance of the header. You can construct a {custom} header by including blocks, similar to when enhancing a weblog put up or web page within the WordPress content editor.
To begin, merely hover over an empty space within the header and click on the ‘+’ icon to add a header block.
Next, you’ll be able to choose any block you’d like to add to your {custom} header. For instance, you’ll be able to add widget block, account block, search block, and extra.
Plus, the header builder additionally allows you to drag and drop the blocks and place them above or under the header.
You can additional customise every block that you just add to the header.
For occasion, choosing the Site Title & Logo block offers you choices to add a web site title and emblem, change the emblem’s width, show a web site tagline, and extra.
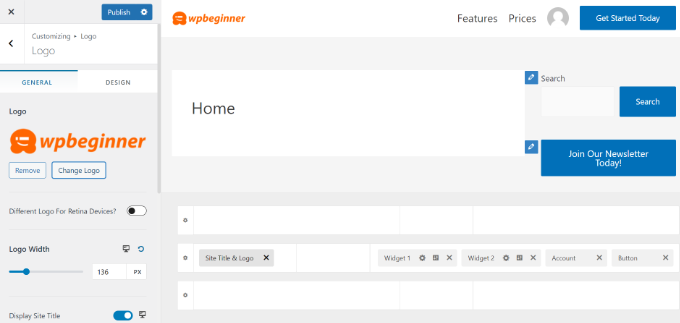
Besides that, you may as well change the background color of the header or add a background picture to seem within the header.
When you’re performed enhancing the {custom} header, merely click on the ‘Publish’ button.
For extra particulars, see our final information on how to use the WordPress theme customizer.
Customize Header by Using the WordPress Full Site Editor
WordPress added full-site enhancing to WordPress in version 5.9. If your theme helps the brand new characteristic, then it replaces the theme customizer. However, presently there are only some themes that work with the total web site editor.
When you utilize a suitable theme, you’ll be able to customise your header by navigating to Appearance » Editor. This will launch the total web site editor, which is rather like the block editor you utilize to write WordPress posts and pages.
When you click on the header, you’ll discover the identify of the template on the high of the web page adjustments to ‘Page Header’.
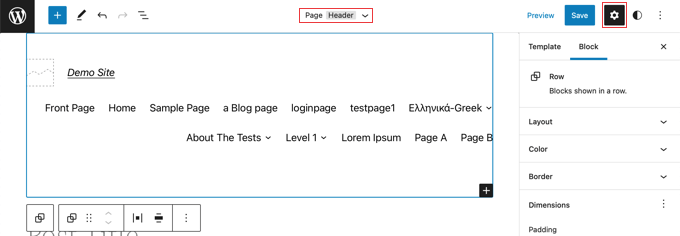
Now once you click on the ‘Settings’ icon on the toolbar, you will notice choices to customise the header’s format, colour, border, and dimensions.
As an instance, we’ll change the header’s background colour. First, you want to click on on the ‘Color’ part to develop it. After that, it’s best to click on on the ‘Background’ choice.
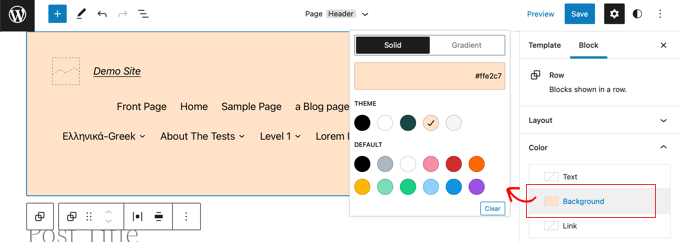
A popup will seem that enables you to choose a strong colour or gradient. There will even be quite a few colours you could choose. When you click on on a colour, the background of your header shall be modified instantly.
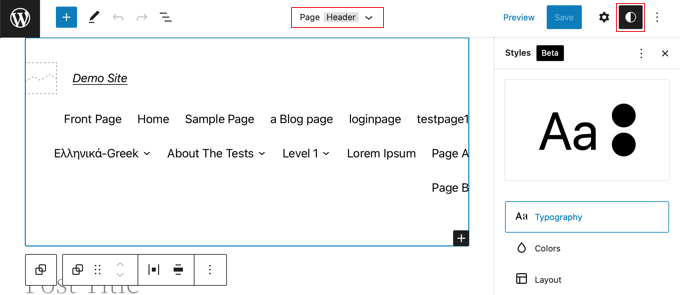
You can discover extra customization choices by clicking the ‘Styles’ icon on the high proper of the web page. This will allow you to change the header’s font, colours, and format.
To be taught extra about how the total web site editor works, see our newbie’s information on how to customize your WordPress theme.
Create Custom Header and Page Layouts with SeedProd
If you need to have complete management over your headers, footers, and sidebars to give your web site a novel design, then we suggest utilizing SeedProd.
SeedProd is the most effective WordPress theme builder plugin that enables you to simply create a {custom} WordPress theme with out writing any code. This consists of creating headers, footers, and the whole lot else wanted for a lovely WordPress theme.
You may even create a number of {custom} header kinds for various pages and sections of your web site.

Note: You can use the free version of SeedProd to create {custom} touchdown pages together with {custom} headers, however you will want the Pro model to create absolutely {custom} themes which embrace sitewide header layouts.
First, we suggest following our information on how to easily create a custom WordPress theme without any code. Once you’ve performed this, SeedProd makes it easy to customise your header.
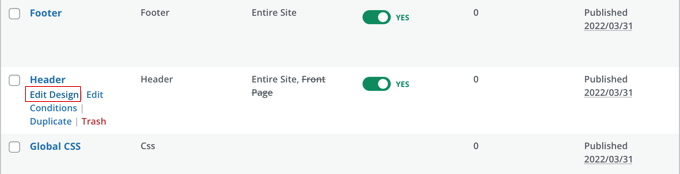
All you want to do is click on the ‘Edit Design’ hyperlink discovered below the header.
This will open the header in SeedProd’s drag and drop editor.
From right here, you’ll be able to simply customise your header by including new blocks.
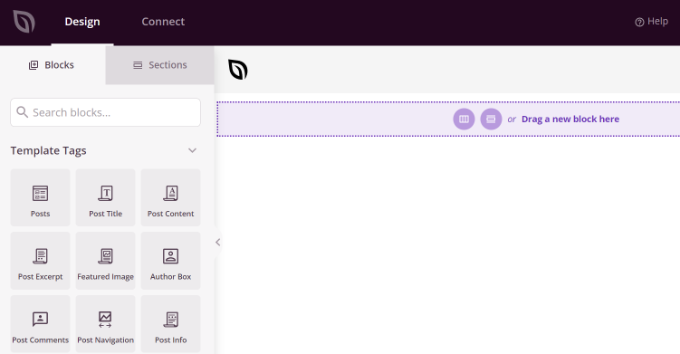
There are blocks for template tags like a web site emblem, any of your WordPress widgets, and superior blocks comparable to a countdown timer, navigation menu, or social sharing buttons.
The better part is you could additional customise every block utilizing the theme builder. For occasion, you’ll be able to change the scale and alignment of your emblem or select which pages to present within the navigational menu. It even permits you to add an image in the header.
With SeedProd, you may as well add an entire part to your theme’s header template.
Sections are a gaggle of blocks, and you should utilize them for various areas in your web site. This consists of headers, footers, options, testimonials, name to motion, and extra.
To use a header part, first swap to the ‘Sections’ tab within the Design panel.
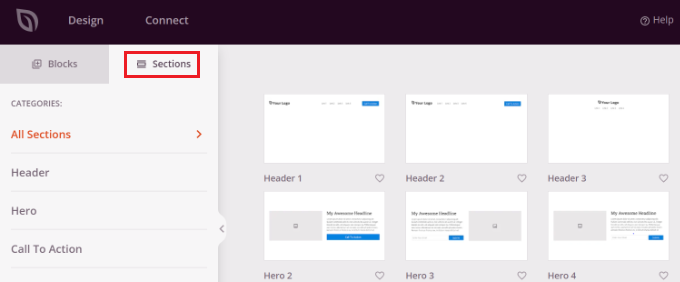
After that, select a header part you’d like to use in your web site. SeedProd gives a number of part templates that you should utilize.
Next, go forward and customise the header part.
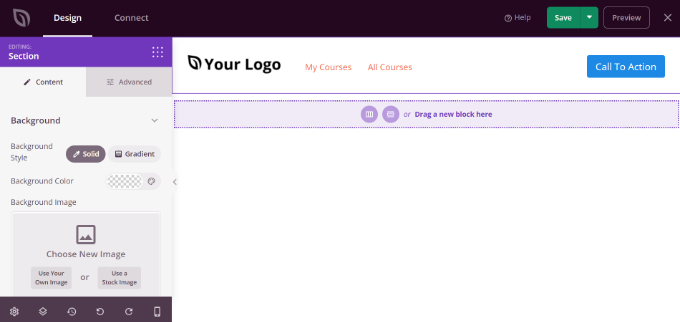
Once you’re blissful along with your {custom} header, be sure you click on the ‘Save’ button to retailer your adjustments.
Now, you’re prepared to publish your {custom} header.
Simply go to SeedProd » Theme Builder web page out of your WordPress dashboard and click on the toggle subsequent to the ‘Enable SeedProd Theme’ choice to Yes.

Once you allow the choice, SeedProd will change your default WordPress theme with a brand new {custom} theme and header.
You can now go to your web site to see the brand new {custom} header in motion.
Create Different Custom Headers for Each Page
Did you understand that utilizing SeedProd, you’ll be able to create {custom} headers for various pages?
The theme builder allows you to add {custom} headers for every web page in your WordPress website. This manner, you’ll be able to present a custom-made header for various classes, tags, put up sorts, web page sorts, and extra.
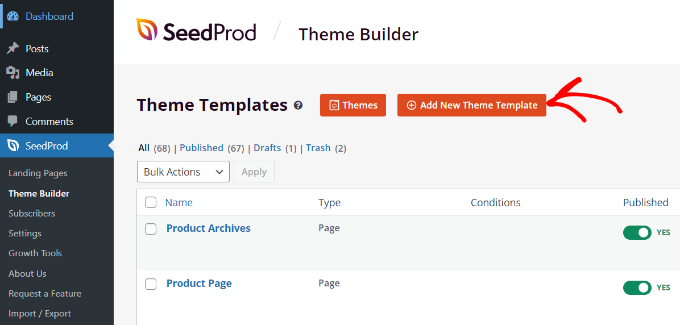
To begin, you’ll want to go to SeedProd » Theme Builder out of your WordPress dashboard and click on the ‘Add New Theme Template’ button.
A brand new popup window will seem the place you’ll want to enter the theme template particulars.
Go forward and enter a reputation in your theme template. After that, select ‘Header’ because the template sort from the dropdown menu. You can depart the ‘Priority’ subject clean.
Next, you’ll want to enter the show situations in your {custom} header. For instance, we used the situations the place it is going to present on all posts and pages which can be within the tutorials class.
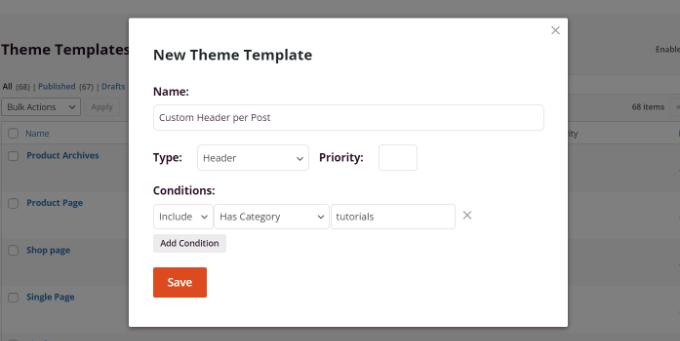
Don’t neglect to click on the ‘Save’ button once you’re performed.
After that, you’ll be able to go forward and edit the {custom} header utilizing the SeedProd drag and drop theme builder.
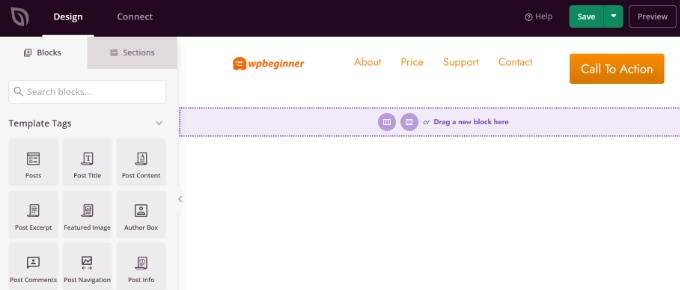
When you’ve completed enhancing the {custom} header, merely click on the ‘Save’ button on the high.
You can see extra concepts on how to customise your header utilizing SeedProd in our newbie’s information on how to easily create a custom WordPress theme utilizing the SeedProd theme builder.
Adding a Custom Header for Each Category
Most web sites show the identical header on all posts, pages, classes, and archive pages. However, you’ll be able to show a special header for every WordPress category.
This could be performed by including code to your theme information, however you’ll have extra management through the use of a theme builder.
We confirmed you earlier how to customise your header utilizing the SeedProd theme builder plugin. SeedProd additionally permits you to create a number of {custom} headers and show them for various classes utilizing conditional logic.
To create a brand new header, you want to navigate to SeedProd » Theme Builder and click on the orange ‘Add New Theme Template’ button. Alternatively, you’ll be able to duplicate your present header and use it as a place to begin.

A popup shall be displayed the place you can provide the theme template a reputation and choose ‘Header’ from the Type drop down menu.
You additionally want to enter a precedence. This is used if a couple of header meets the situations for a sure web page, and the header with the most important precedence shall be displayed. The default header has a precedence of 0, so be sure you enter 1 or greater.
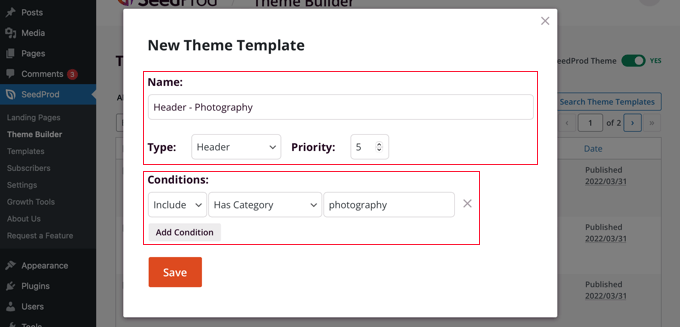
After that, you’ll want to arrange a number of situations. This lets SeedProd know when to show a sure header. You merely choose the situations from drop down menus.
On the primary two menus, you want to choose ‘Include’ after which ‘Has Category’. In the final subject, it’s best to sort the identify of the class the place you need the header to be displayed.
You can simply show the identical header for a number of classes by clicking the ‘Add Condition’ button and together with one other class. When you’re completed, be sure you click on the ‘Save’ button to save the brand new header.
Now you’ll be able to customise the design of every new header utilizing SeedProd’s drag and drop editor as we confirmed you earlier.
To be taught extra, together with how to do that utilizing code, see our information on how to add custom header, footer, or sidebar for each category.
Add a Widget Area to Your WordPress Header
If you’re constructing a {custom} theme from scratch utilizing code, then you definately is likely to be trying to add a WordPress widget to your header to seize the eye of your guests. Widgets enable you to add content material blocks to particular sections of your theme simply, however not each theme features a header widget space.
We talked about earlier how easy it’s to add widgets to your header utilizing the SeedProd theme builder. But what if you want to add a widget to a traditional WordPress theme’s header?
Some themes, just like the Astra theme, allow you to do that utilizing the WordPress theme customizer. For instance, Astra provides an choice known as ‘Header Builder’ that allows you to fully customise the header, together with including widgets.
If your WordPress theme doesn’t presently have a WordPress widget space within the header, then you definately’ll want to add it manually by including the next code to your functions.php file, in a site-specific plugin, or through the use of a code snippets plugin.
This is a extra superior choice, because you’ll want to know the place to place the code and the way to type it utilizing CSS.
perform wpb_widgets_init() {

    register_sidebar( array(
        'identify'          => 'Custom Header Widget Area',
        'id'            => 'custom-header-widget',
        'before_widget' => '<div class="chw-widget">',
        'after_widget'  => '</div>',
        'before_title'  => '<h2 class="chw-title">',
        'after_title'   => '</h2>',
    ) );

}
add_action( 'widgets_init', 'wpb_widgets_init' );
This code registers a brand new sidebar or a widget prepared space in your theme.
If you go to Appearance » Widgets, then you will notice a brand new widget space labeled ‘Custom Header Widget Area’. Now, you’ll be able to add your widgets to this new space.

Finally, you want to add some code to your theme’s header template positioned within the header.php file of your theme. This will add the widget space you created earlier to your header in order that the widgets shall be displayed in your web site.
You want to copy this code snippet and paste it the place you need the widget to show.
<?php

if ( is_active_sidebar( 'custom-header-widget' ) ) : ?>
    <div id="header-widget-area" class="chw-widget-area widget-area" function="complementary">
    <?php dynamic_sidebar( 'custom-header-widget' ); ?>
    </div>

<?php endif; ?>
Depending in your theme, you might also want to add CSS to WordPress to management how the widget space is displayed.
For extra particulars, see our information on how to add a WordPress widget to your website header.
Add Random Header Images to Your WordPress Blog
Another manner you can also make your WordPress headers extra enticing is by including random photographs to the header part.
Showing photographs that randomly change helps seize your guests’ consideration and make your content material extra participating.
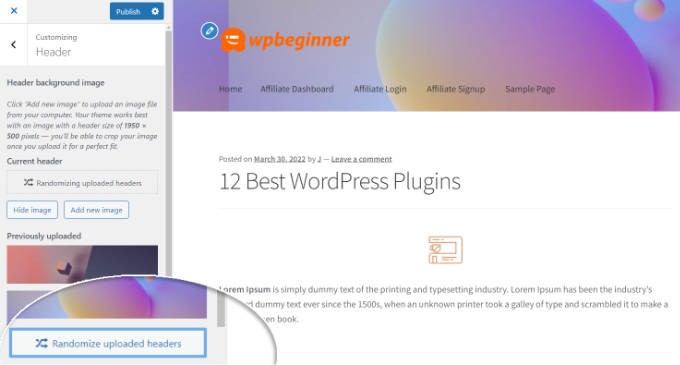
To add random header photographs to your WordPress blog, you should utilize the theme customizer and add photographs to the header part. This choice might range relying on the WordPress theme you’re utilizing.
Next, go forward and choose the ‘Randomize uploaded headers’ choice.
If you need extra management and suppleness in displaying random photographs within the header part, then you may as well use a WordPress plugin.
For extra particulars, see our information on how to add random header images to your WordPress blog.
Add Code to Your Website’s Header (Advanced)
Finally, for those who’re wanting to add custom code to your web site’s header part, you are able to do that simply out of your WordPress dashboard. This technique is beneficial for superior customers and never appropriate for freshmen as a result of it consists of enhancing code and requires technical information.
You can discover your theme’s header information by going to Appearance » Theme File Editor from the WordPress admin panel. In the ‘type.css’ theme information, you’ll be able to scroll down to the location header part and add or take away code.
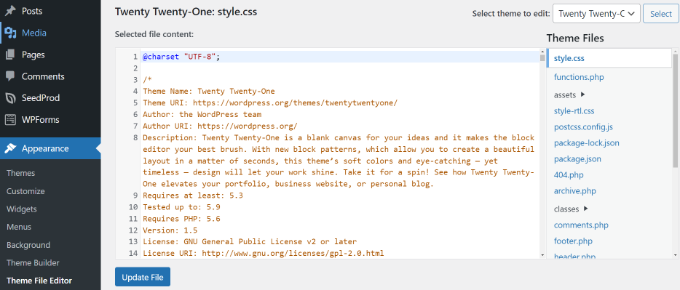
Note: We don’t suggest that you just immediately edit the theme information as a result of the slightest mistake can break your web site and mess up the design.
An simpler manner of including {custom} code to edit your web site’s header is through the use of the Insert Headers and Footers plugin.
First, set up and activate the Insert Headers and Footers plugin. For extra particulars, please see our information on how to install a WordPress plugin.
Upon activation, you’ll be able to go to Settings » Insert Headers and Footers out of your WordPress dashboard. Next, enter the {custom} code within the ‘Scripts in Header’ part.
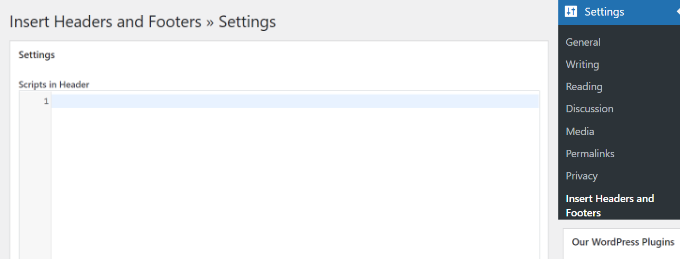
After coming into the code, save your adjustments.
For extra particulars, you’ll be able to see our information on how to add header and footer code in WordPress.
We hope this tutorial helped you find out how to customise your WordPress header. You can also need to be taught how to choose the best web design software, or try our list of must have plugins to grow your site.
If you preferred this text, then please subscribe to our YouTube Channel for WordPress video tutorials. You can even discover us on Twitter and Facebook.
The put up How to Customize Your WordPress Header (Beginner’s Guide) first appeared on WPBeginner.
")


