


Register, handle, and join limitless inexpensive domains straight from WPMU DEV – making creating web sites for you and your purchasers simpler than ever!
Domain registration is all completed proper from WPMU DEV’s Hub. It simply takes a couple of clicks, with limitless choices for choosing top-level domains.
As you’ll see, area administration has been streamlined for net builders on our Agency Plan. Especially when managing domains for a number of purchasers.
In this text, we cowl all the pieces it’s essential to learn about utilizing domains with WPMU DEV, together with:
If you’re a member, you can get started here. Not a member but? Get began with a trial of our Agency plan immediately!
Now that you just’re able to go let’s…
Register a New Domain
Registering a New Domain is fast and easy. Whatever area you’re searching for, we’ve got 120+ extensions — whether or not or not it’s .com, .org, .store — you title it! They’re all inexpensive. (And P.S. — We’ll be including one other 100-150 TLDs VERY quickly.)
It’s additionally necessary to notice that domains are for Agency Plan members ONLY. We can solely provide this type of service at wholesale pricing by making it unique (simply as we did with Quantum hosting).
We present domains purely at cost (buy and renewal), with no margin for us (besides to cowl transaction charges) so that you could resell them to your purchasers with your individual markup and get monetary savings on your current supplier.

So, now that the gist of our domains, right here’s…
Where to Begin
Registering a brand new area begins from the Domains tab and Register New Domain. Just kind the area title you wish to use.

Once you kind within the area title you favor, an inventory of choices will seem with numerous costs.
In this instance, I’d wish to register the title ‘awesomewebguy.’ As you’ll be able to see, many top-level area choices appeared (e.g. .org, .internet, .on-line, and many others.) below Matches.

Want to see different choices? Click Load More, and you’ll get others.

WPMU DEV domains even have Suggestions for a brand new area based mostly on your search standards.

Once you’ve gotten a site title, click on Buy Now. And that’s it!
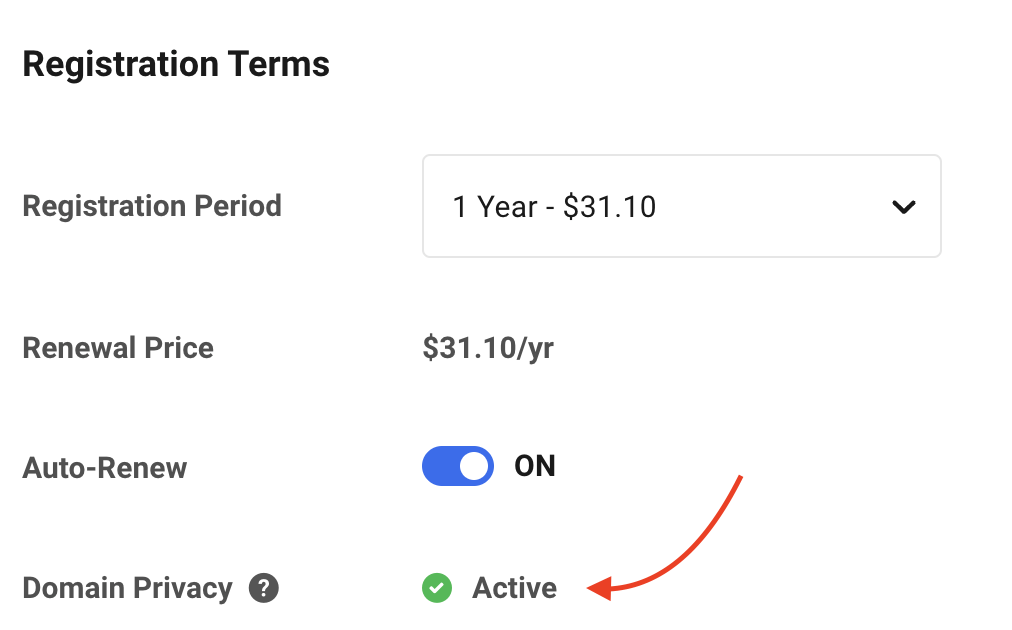
You’ll be directed to a registration web page. From this web page, you pick the Registration Terms. This contains the Registration Period, Renewal Price, and Auto-Renew.
To begin, choose a Registration Period. This might be wherever from one to 10 years!
Choose between 1-10 years in a click on.
Also, decide whether or not you’d wish to auto-renew or not (you’ll be able to at all times change this later – as you’ll see).

Just to notice, Domain Privacy is robotically included with each area.
Next, enter the Registrant info. From right here, it’s also possible to affiliate the registrant info with a shopper from the dropdown (we’ll have extra on associating domains with a shopper later on this article).
This is details about you because the area proprietor. None of this info is publicly shared or on WHOIS.

Once your area is efficiently registered, you’ll be able to robotically add DNS information by clicking hook up with a hosted website. If you don’t wish to join your area to a hosted website – no biggie. Click Skip for Now.

That being stated, let’s say you wish to join area to a hosted website. Here’s the way it’s completed…
Add Domain to Hosted Site
Adding a site to a hosted website with WPMU DEV doesn’t take a lot in any respect to arrange.
You can do that whereas creating your area or after the area is verified and accomplished. Just choose from the dropdown what website you prefer to the area to be hosted on.

Add your area to a hosted website at any time. From the Domains tab, you’ll see by your website a Link Icon.

Just click on Connect to a Hosted Site, and choose from the dropdown what website you’d like to make use of.

Click Save, and you’ll see your area’s DNS standing. It could take a short time to finish. You can recheck your standing by tapping Settings (the ellipsis).

Below this space, you’ll additionally see the DNS info for the location you’re utilizing together with your area. It contains the CNAME Record, A Record, and AAAA Record.
Note: for those who use the Connect Domain characteristic, you don’t need to manually add any DNS file.

Ready to go dwell? We have an awesome guide that takes you thru how one can do it step-by-step.
View Your Registered Domains
Once you register a brand new area, it will likely be situated below Registered Domains. If you view it quickly after registering a site, you’ll see that its Registrant Status possibly be ‘verifying.’

A message will seem indicating that as effectively.

So, how do you go about verifying the registrant standing?
Our finest professional WP instruments in a single bundle
Try free for 7 days
30-day money-back
Confirm Your Registrant Information
Once you register your area, you’ll obtain an electronic mail. This is to make sure that you’re who you say you’re relating to your area possession and to finish your registration.
Whatever electronic mail handle you embrace in your Registrant Information is the place this electronic mail can be despatched. Once opened, that is what it says:

It comprises two hyperlinks: one is to overview ICANN’s Policy, and the opposite is to proceed on with verification.

When verified, you’ll get notified instantly.

Please understand that for those who don’t confirm inside 15 days, the area can be suspended till you confirm it. So, be certain that to finish this necessary step.
Domain Management in The Hub
All of your domains are in a single place in The Hub below Domains. This is your one-stop space the place you’ll be able to new, replace, handle, and extra.

By clicking on the ellipsis by particular person domains, you immediately have entry to key options, akin to:
- Manage Domain
- Renew Domain
- Update Contact Information
- Update Nameservers
- Update DNS

To make it simpler for you and your purchasers, you’ll be able to activate Auto Renew in a single click on.

Click on the title or standing of the area to get to the Domain Overview web page. From the Overview, you’ll be able to view a ton of knowledge. Everything from Domain Status, Registration Date, GDPR status- – and extra!
Be certain to check out our documentation for an in-depth look.
Domain Overview
Get a 360-degree view from the Domain Overview.
This is an overlook the place you’ll be able to see the area standing (lively or inactive), expiration date, whether or not auto-renew is activated – and extra!

Perform duties from this space as effectively, akin to renewing a site, activating auto-renew, and implementing switch lock.
Find out extra in our documentation.
All the contact info relating to the area Owner, Admin, Billing, and Tech are within the Contact Information tab. You can at all times modify, add, and delete info.

Manage DNS
All of the present DNS information are situated within the Manage DNS space. From you, you’ll be able to add a Subdomain, electronic mail, or customized DNS information.

Learn much more in our information on how to add a Subdomain.
Filtering Domains
Filtering domains is a approach to shortly and simply discover particular domains, set up the checklist of domains you wish to view, discover who’s registered for domains, and extra!

Once clicking Filter, you’ve gotten choices for:
- Domain Status
- Registrant
- Registrant Status
- Auto Renew
- Hosted Site Status

Each possibility has totally different varibles of their dropdowns. For instance, for those who select Domain Status, the dropdown contains Active, Suspended, and Expired.

Connected Domains
View all your Connected Domains in a single place. This part shows all of your linked domains and their standing (e.g. propagated accurately or pending).

You can Manage DNS, Recheck DNS, and Delete on the ellipsis.

If you click on Manage DNS, you’ll be able to add the Nameservers and view Records (e.g. AAAA and A). It additionally shows the TTL for every file.

It additionally signifies the place it directs to by every kind of DNS file.
Client Association
The Client Association characteristic permits you to affiliate a site with a shopper out of your Clients & Billing portal. Additionally, it means that you can simply change or take away the shopper that you will have related to the area while you registered it.
By associating a shopper with a site, it robotically populates the Owner Contact Information of that area with the shopper’s info, making it fast and much less time-consuming to enter. Also, this may be edited at any time.
The Client Assocationa part is situated below any particular area. Or, as talked about earlier, you’ll be able to choose this from the dropdown when creating a brand new area.
Click Add Client to get began.

From there, there’s a dropdown the place you’ll select the shopper to affiliate with the area.

That’s it! Your shopper is now related to this area.
You can take away purchasers at any time, and additionally, when you’ve got granted the shopper a Client Role that features View Domains, they will just do that and additionally change info — if allowed. For extra info, make sure to read our documentation.
Domain Management Made Simple
You can see how easy and straightforward it’s to arrange, implement, and handle domains with WPMU DEV and The Hub! With a brand new area, you might be up and working in only a few clicks.
Plus, coming quickly in 2023 — you’ll basically be capable of create your individual GoDaddy! More on that to return…
So, what are you ready for? To get began, for those who haven’t tried our Agency plan, start your 7 day no obligation free trial today. And if you’re already an Agency member, begin registering domains instantly!
")
")


